Exposure remains the one aspect of photography that many people seem to struggle with. Understanding the reciprocal relationship of the components of the exposure triangle (Aperture, Shutter speed and ISO) and the concept of doubling or halving of light with stops is not intuitive. I have written about this before in How Crucial is it to get Exposure Correct and my Basics of Exposure pdf is a popular download.
For the past year or so my approach to exposure has changed from ETTR (Expose To The Right) to using the lowest ISO I can with the slowest shutter speed I can get away with. In most of my wildlife/bird photos I am at the widest aperture so this isn’t something I change unless I need to for increased depth of field.
Because my aperture is usually wide open, exposure decisions are then controlled by adjustments to shutter speed and ISO. I know that with my Nikon sensors there is no penalty in increasing the brightness in post compared to shooting at a higher ISO. The major contributor to noise is photon noise and this is controlled by the amount of light hitting the sensor. I can get more light by opening the aperture (seldom an option) or slowing the shutter speed (within the limits of still getting a sharp image). The issue to avoid is blowing highlights as that is unrecoverable – an underexposed image is more salvageable than an overexposed one (and no different to a correctly exposed one that required a higher ISO).
So practically what does this mean?
I shoot in full manual as I don’t want exposure changing as birds fly past changing backgrounds (remember that AutoISO is an auto mode even if the other parameters are set manually)
I set my aperture wide open (smallest f number – f6.3 on my Z 800mm or 180-600mm) unless there is a good reason to close it down.
I set my shutter speed for the type of image I want – sharp, blurred wing tips, pan blur.
I set my ISO to the lowest level that lets me see the image in the viewfinder clearly and am quite relaxed with a histogram that doesn’t approach the right side (this is all dependent on the ambient light). I have my histogram visible in the viewfinder as I definitely don’t want the right side clipped.
There is no benefit in using ISO to push the histogram to the right to achieve ETTR.
Caveat to all of this – only works with RAW files that you will process in computer. If you’re shooting JPG only you need to adjust ISO to achieve a correct exposure in camera as the processing you would do on your computer with the RAW is baked in by the camera for the JPG.
I process my RAW files with DxO PureRAW. I started to use this before AI noise reduction was built into Lightroom and I was blown away with how much better my images were. Lightroom can now do a very similar job. The issue is that even if shot at ISO 500, if an image needs to be brightened by 2 stops it is the equivalent of having been shot at ISO 2000 to achieve the correct histogram at capture.
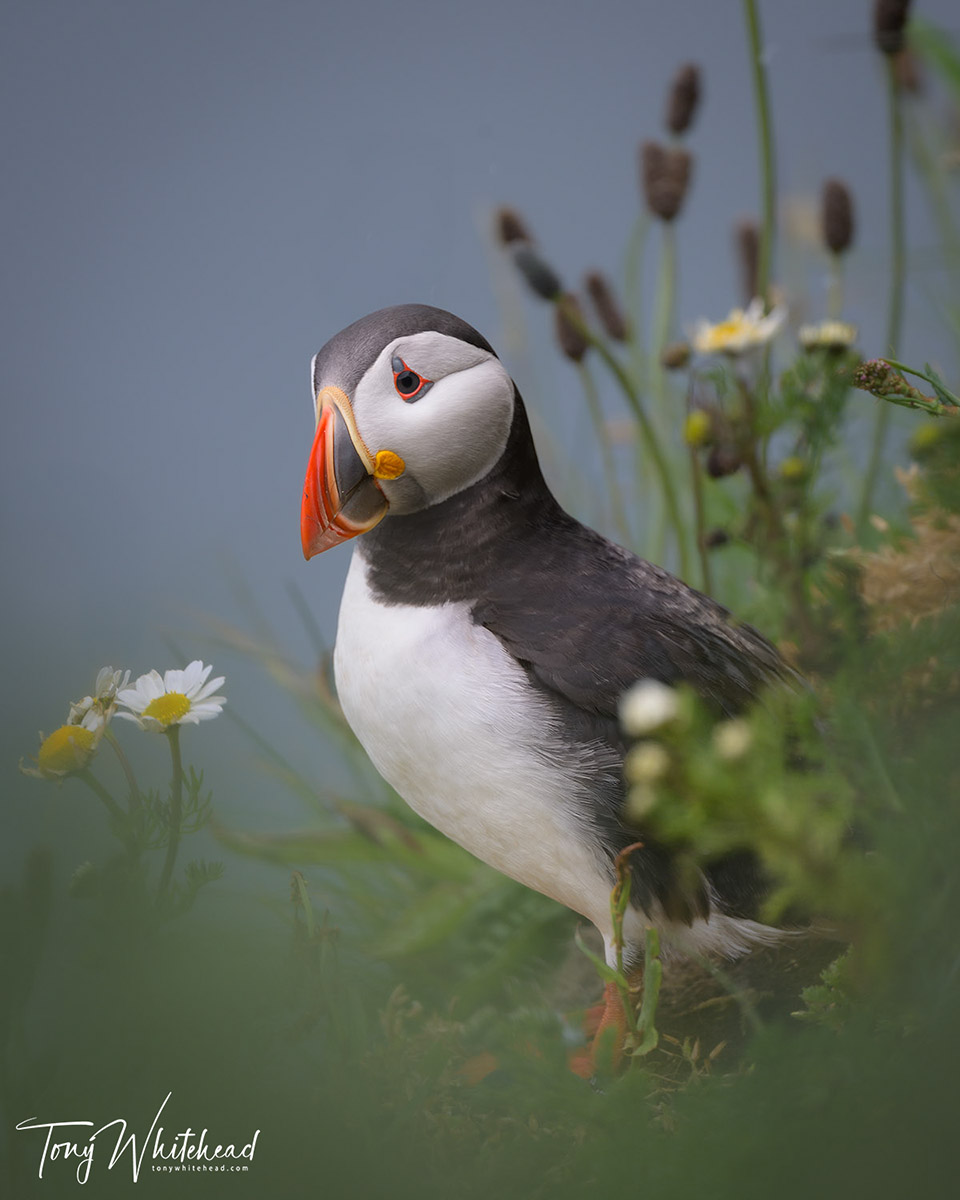
The image at the top of this post was an example of this approach. A close and static subject required a slight increase in depth of field to keep the eye and bill sharp so I closed down to f7.1. Being static I was comfortable that 1/60s would achieve some sharp images from a burst even at 800mm (most were sharp apart from when the puffin was turning his head). My priority here was to be as close to base ISO to achieve maximal dynamic range for the black and white plumage. Pushing my ISO up to achieve a higher shutter speed would have sacrificed image quality in this situation.
To be fair I usually take images with low and high ISO – easily switching between settings with the Recall Settings feature. This is a reasonable insurance approach to ensure an image with high ISO high shutter speed Birds in Flight mode and then trying to get a better one at Low ISO, slower shutter Pan Blur mode.
Take home message. Aperture wide open (unless a reason not to), Shutter speed to create the type of image you want. ISO set to see the image clearly in the viewfinder while making sure the right side of the histogram is not clipped. No need to flirt with highlight clipping to achieve ETTR.
The trigger for this post was a post by Steve Perry on Backcountry Gallery where he covers this in a nicely illustrated video that largely mirrors what I have been doing for the past year.
Atlantic Puffin photo with Nikon Z9 and Nikkor Z 800mm f6.3 VR S